
“I am trying to recover a deleted voicemail and there is no undelete option. How can I recover the deleted voicemail? I have an iPhone 16 running iOS 18. Please help!”
Have you ever mistakenly deleted a voicemail on your iPhone and then want to get it back? Or your iPhone voicemails disappeared due to iOS 18 update, jailbreak, software crash, virus attack, etc.
Worry not. In this article, we will walk you through how to undelete/recover deleted vociemails on iPhone with or without backup. The instructions apply to all iPhone models even running the latest iOS 18. Keep reading.
Yes, your deleted voicemails are not completely removed from iPhone and can still be recovered without hassle. There is a built-in feature on iPhone that allows you to undelete voicemails.
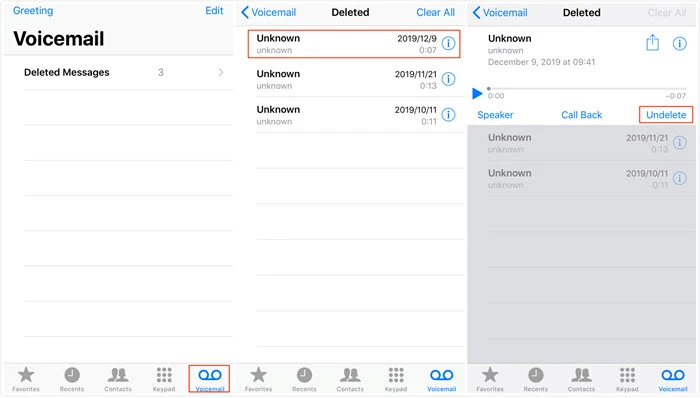
When you delete a vociemail on your iPhone, it will be removed to a folder called "Deleted Messages", which is the same as the trash or recycel bin on a computer. So, you can easily get back deleted voicemails by checking that folder.
What if the deleted voicemails don't appear in the Deleted Messages folder? Don't worry. You still have chances to get them back as long as they have not been overwritten by new data added to your iPhone. All you have to do is using a third-party recovery tool and perform the recovery as soon as possible.
Now we know that it is possible to recover voicemails you deleted from your iPhone, let's get into the instructions on how to do it.
If you have recently deleted important voicemails on your iPhone and now would like to get them back, follow these steps to undelete voicemails on iPhone from Deleted Messages folder:
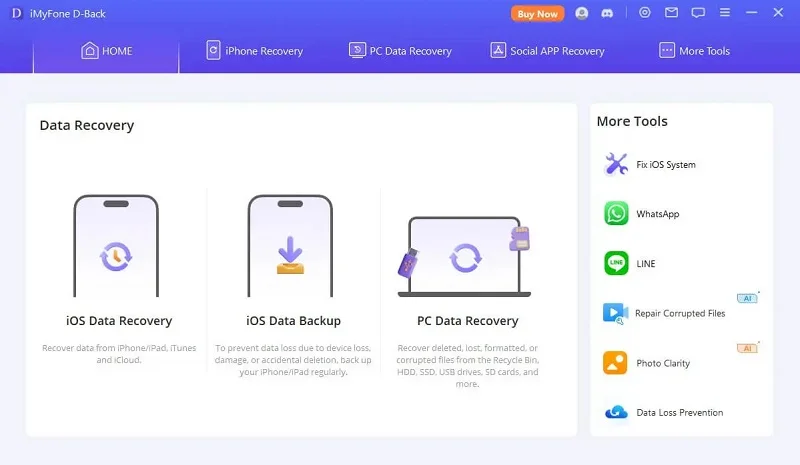
When you unable to undelete vociemail on iPhone from the Deleted Messages folder, you can try to use a third-party data recovery tool - FoneGeek iPhone Data Recovery. It is famous throughout the world and well accepted by millions of iOS users.
With this program, you will have access to all of your deleted and existing voicemails. You can simply get the lost voicemails back with or without backup.
Now follow the steps below to learn how to recover permanently deleted voicemails on iPhone without backup:


Step 1. Download and install this iPhone Voicemail Recovery on your computer. Choose "Recover from iOS Device" and connect your iPhone using a USB cable.
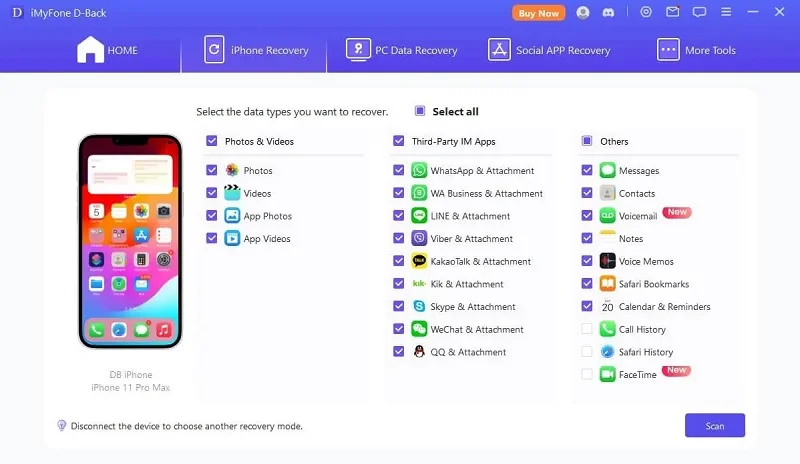
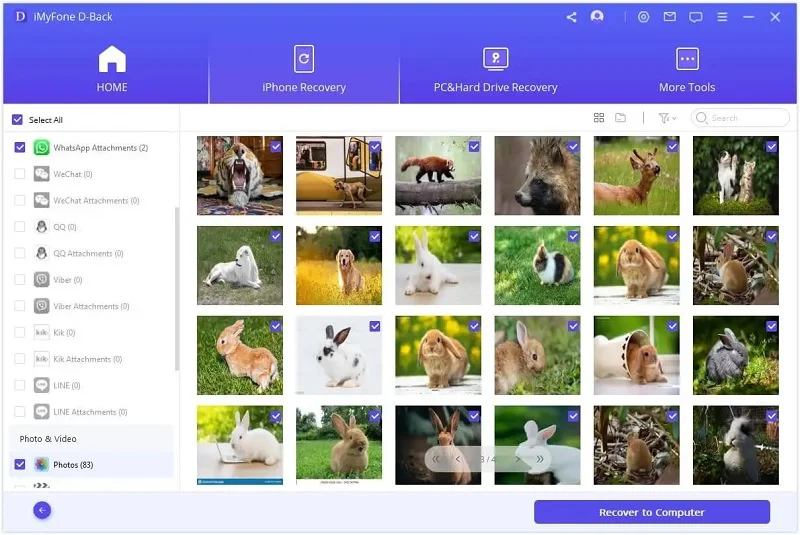
Step 2. Choose the data types you want to retrieve from iPhone, then click on "Scan" to begin scanning.
Step 3. Once the scan has been done, the deleted and existing vociemails would be showed for you to preview. Just choose the files you need and click on "Recover to PC".
Apple provides the option to save all your iPhone data to computer using iTunes. If you have backed up your iPhone to iTunes before losing voicemails, you can easily restore the iTunes backup to your iPhone to get back the deleted voicemails. The process will restore all your data, inclduing the deleted voicemails. Here's how you can do it:
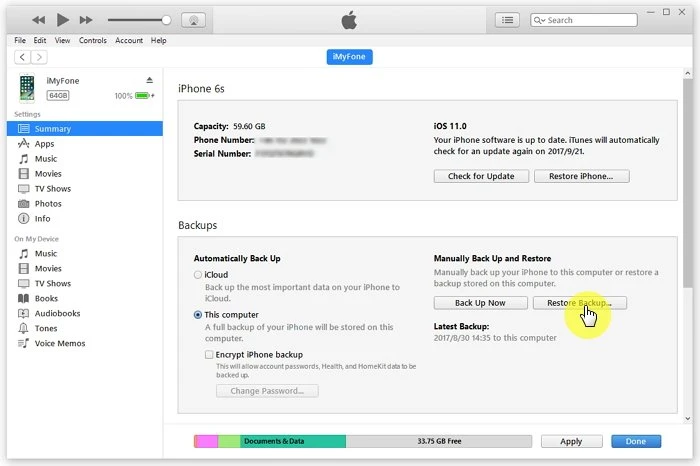
Important Note: Restoring from an iTunes backup will replace all existing data on your iPhone with the data from the backup, so make sure to back up any recent data before proceeding.
Plus, you won't be able to preview the deleted files and restore voicemails only. Then, we suggest you use FoneGeek iPhone Data Recovery to selectively recover deleted voicemails from iTunes backup.
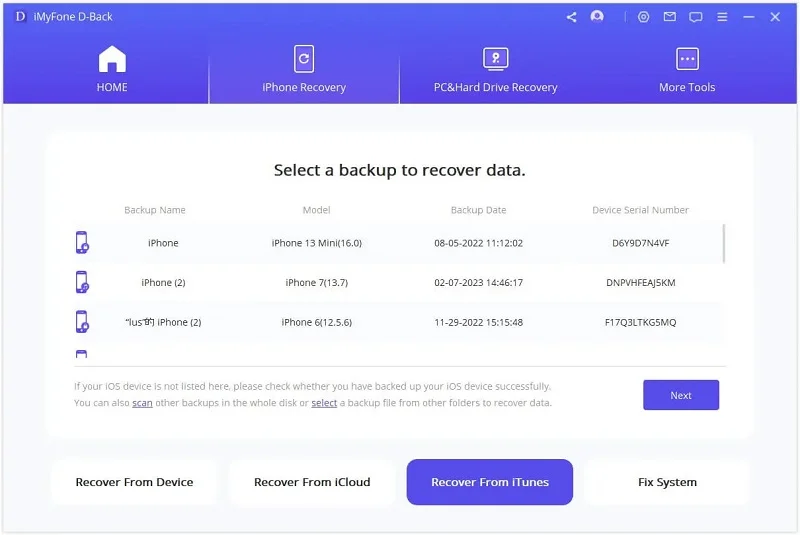
Step 1. Run the program and choose "Recover from iTunes Backup". If you have ever backed up your iPhone with iTunes, the iTunes backup files will be displayed on this program. You need to choose one to proceed.
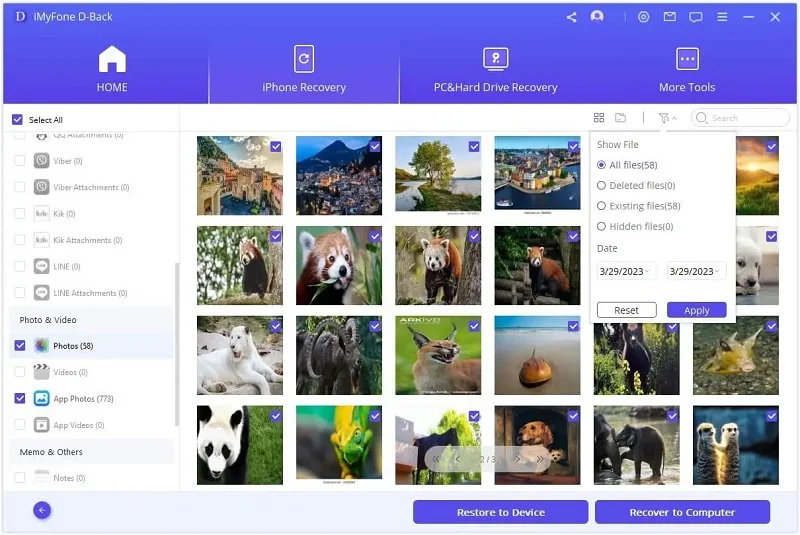
Step 2. Click on "Next" and the scanning process will get started, you can view all the files on the iTunes backup.
Step 3. After reading and verifying these files, you'll be able to choose any items you want to recover and save them to your computer.
If iCloud backup is turned on, your iPhone data will be automatically backed up to cloud server when the device is connected to Wi-Fi. Same as iTunes, you can retrieve deleted voicemails on iPhone by restoring the device from iCloud backup.
Go to Settings > [your name] > iCloud > Manage Backup > Backups to ensure that you have a recent backup to restore from, then follow the steps below:
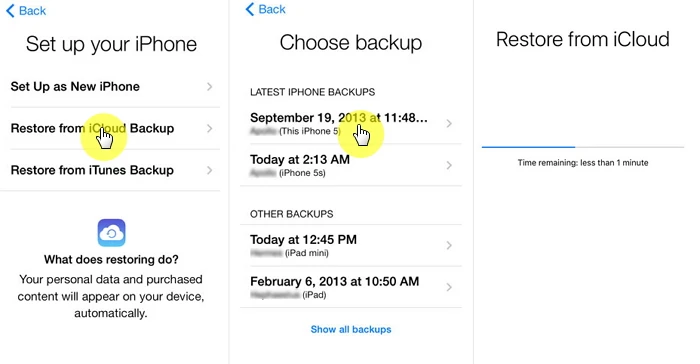
Remind Again: As you can see, you need to wipe your iPhone before restoring the iCloud backup, which might cause new data loss on the device. Worse still, there is no option to preview the deleted files and selectively restore only the voicemails.
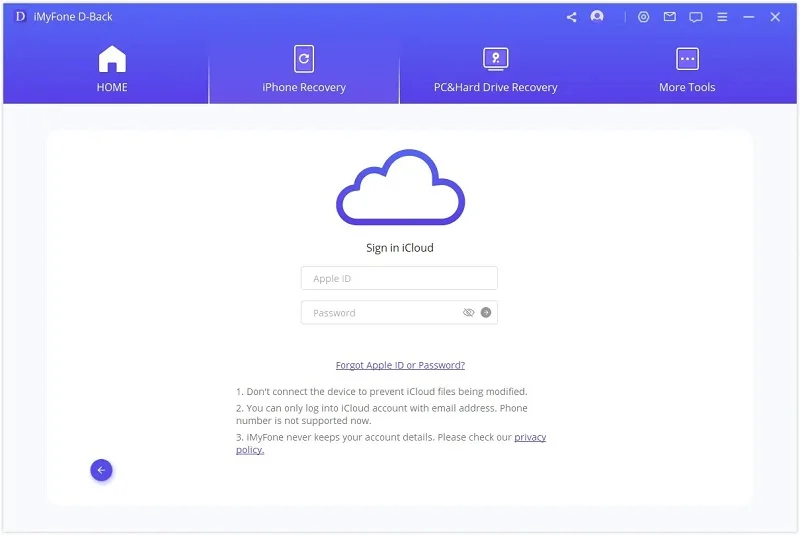
Why not use FoneGeek iPhone Data Recovery? It allows you to recover only voicemails from iCloud backup without having to reset the device.
Step 1. Run the program and select "Recover from iCloud" from the home interface. Sign into iCloud account using your Apple ID and password.
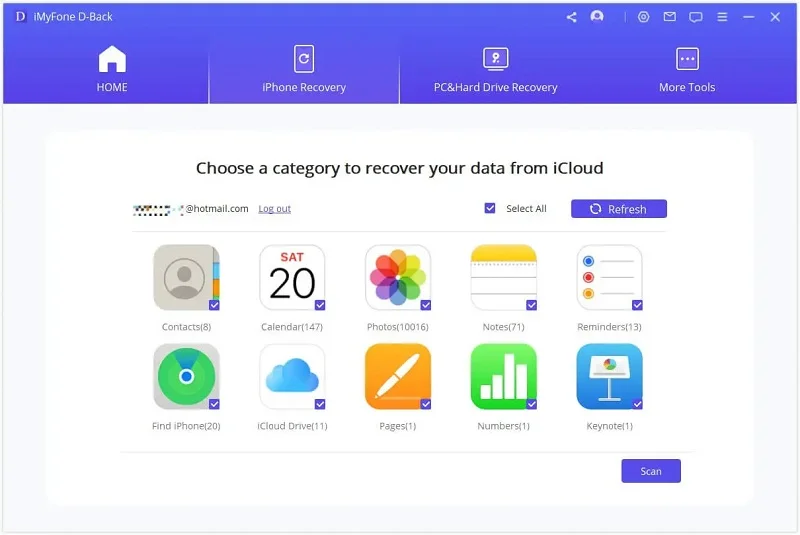
Step 2. Select any data you want to restore and click the "Scan" button to beging downloading iCloud data.
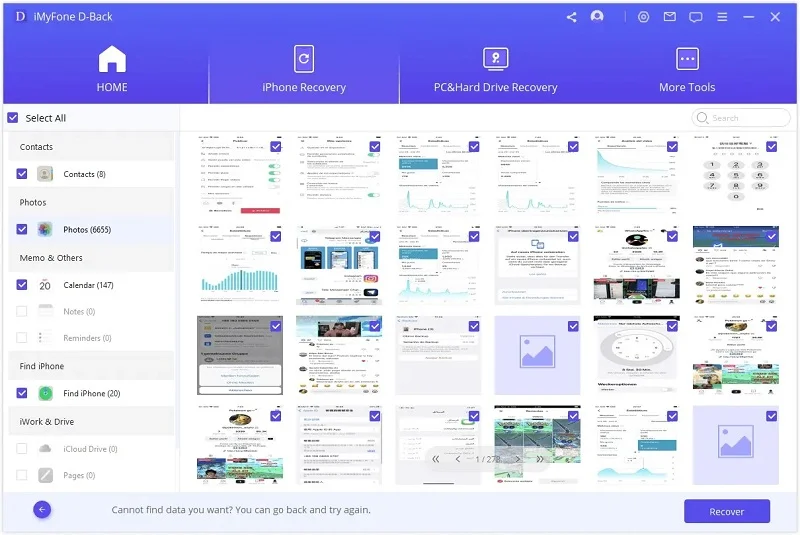
Step 3. Once you've downloaded the data, you can preview the data and choose the files you want to recover, then click on "Recover" to save them on your computer.
In some case, contacting your phone carrier can help to retrieve your deleted voicemails. Some carriers may store voicemails on their servers for a limited period, typically ranging from a few days to a few weeks. If the voicemail was recently deleted, they might be able to recover it from their server backups.
However, keep in mind that carrier policies can vary, and there's no guarantee they will have the deleted voicemails available for retrieval. It's best to reach out to their customer support as soon as possible to explore the possibility of recovering your deleted voicemails.
You may wonder how long the deleted vociemail messages are stored in your iPhone. Well, it depends on the particular phone carrier you are using. For most carriers, the voicemails are saved in Deleted Messages folder for 30 days.
If you deleted a voicemail more than 30 days, you won't be able to undelete it. If you don't have any deleted voicemails available for you to recover, the Deleted Messages folder will not appear in your voicemail inbox.
Yes, of course. Please stop using your iPhone and immediately use third-party tools like FoneGeek iPhone Data Recovery to directly scan the device and recover permanently deleted voicemails even without backup.
To delete voicemails permanently from your iPhone, you can open the Phone app and choose "Voicemail", then tap on "Deleted Messages". Tap on "Clear All" in the top-right corner to empty your Deleted Voicemails folder.
Yes, you can. There are many third-party data recovery tools that could help you in this situation. One reputable tool that has been widely used is FoneGeek iPhone Data Recovery. It is able to recover various types of data, including voicemails, from iPhone even without a backup.
Certainly! You can recover deleted voicemails on your iPhone without using a computer by either checking the "Deleted Messages" folder or restoring your iPhone from an iCloud backup.
Apart from voicemails, FoneGeek iPhone Data Recovery also supports to recover permanently deleted contacts, messages, call logs, photos, videos, notes, WhatsApp, Viber, Kik, and more data from iPhone or iPad.
In this comprehensive guide, we've explored different methods to recover deleted voicemails on an iPhone, such as searching the "Deleted Messages" folder, using third-party tool like FoneGeek iPhone Data Recovery, restoring from an iTunes/iCloud backup, and even contacting your phone carrier.
By following these step-by-step procedures and choosing the appropriate tools, you have a chance to successfully retrieve your lost voicemails from iPhone. Remember to act quickly when attempting data recovery and consider regular backups as a preventive measure for any future data loss.
Joan J. Mims is interested in researching all tips about iPhone, iPad and Android. He loves to share useful ideas with all users.
Your email address will not be published. Required fields are marked *


Copyright © 2025 FoneGeek Software Co., Ltd. All Rights Reserved


 English