
“At one time Notes would allow a photo to be taken as a PDF file but that feature is no longer available. How can I save a photo as a PDF on iPhone?”
Photo on your iPhone are typically saved as HEIC, JPG or PNG, which works well for most purposes. However, converting an image to a PDF can be useful, especially when you want to preserve formatting or remove metadata like location details.
Want to turn a photo into a PDF? Good news - you can do it for free using built-in iPhone features, without any third-party apps. In this guide, we’ll show you how to easily save a photo as a PDF using your iPhone's native tools.
Converting your iPhone photos into PDFs comes with several benefits. Here’s why you might want to make the transfer:
With these advantages, converting your iPhone photos to PDF is a smart choice. Let’s explore the easiest ways to do it!
The Print option in the iPhone or iPad Share Sheet allows you to print files and images without needing an extra app. When you print an image, it automatically converts JPG files into PDFs before sending them to the printer. Here’s how you can use this feature:
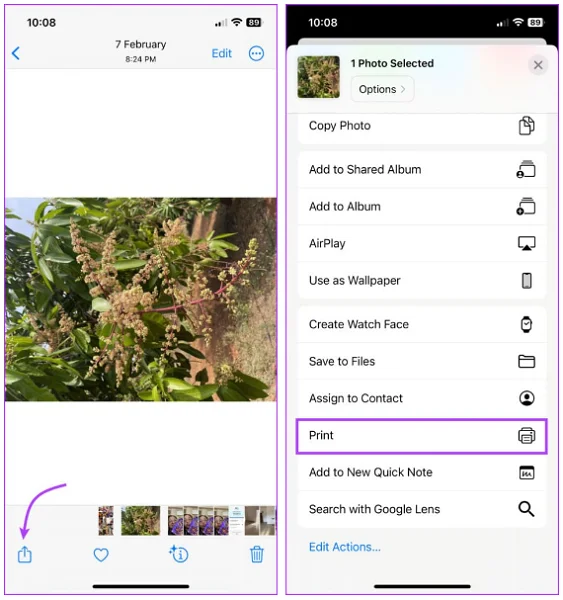
Step 1: Open the Photos app on your iPhone. Choose the photo or photos you want to be converted to PDF format.
If you pick more than one photo, the selected ones will be put together in one PDF file, each on one page.
Step 2: Press the "Share" icon in the bottom left corner, then scroll down until you find the "Print" option.
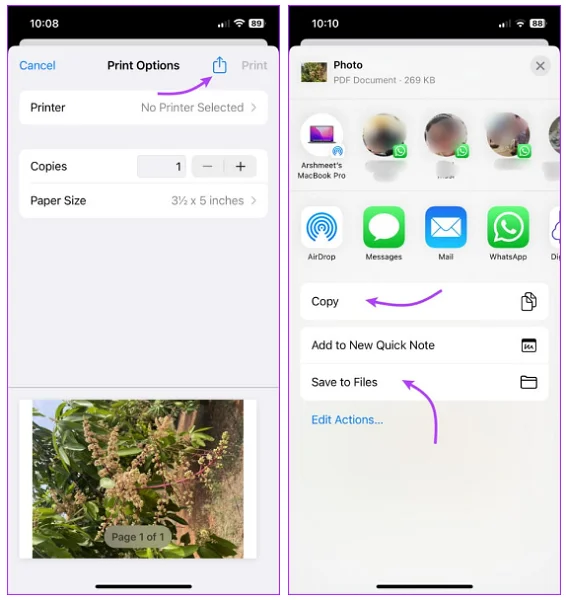
Step 3: Change the "Paper size" or the number of copies you want, then select the "Print" option from the top right corner.
Step 4: To export the photo in PDF format, hit the "Save to Files" option. Alternatively, you can upload the PDF file to your Google Drive, email, WhatsApp, or send it to anyone.
The Files app on iOS is a powerful tool for managing documents and images. It also lets you quickly convert images to PDF for easy sharing or storage.
To use this feature, your photos must first be saved in the Files app. Simply open the Photos app, select the images, tap "Share," and choose "Save to File" before converting them to PDF.

Now that your photos are saved in the Files app, here’s a quick tutorial on how to convert them to PDF:
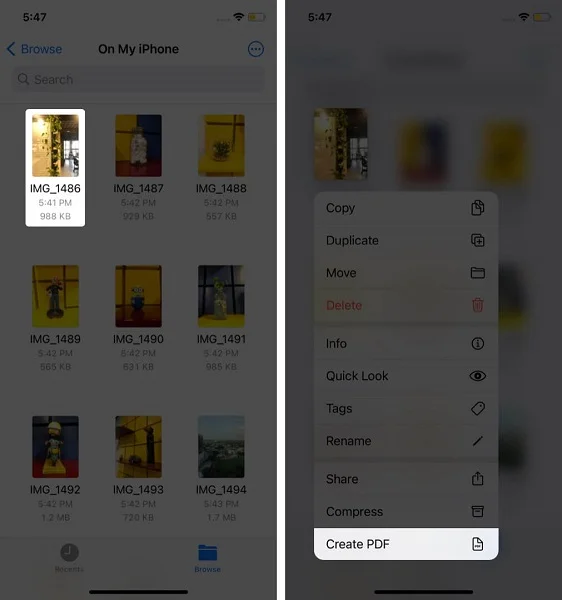
Step 1: Open the Files app and find the photos you want to convert.
Step 2: If you want to convert one photo on your iPhone into PDF format, long press on that photo. Scroll down the pop-up menu until the bottom and select "Create PDF."
Step 3: If you're converting more than one photo, you first need to hit the "More" button in the upper right corner and then choose the "Select" option.
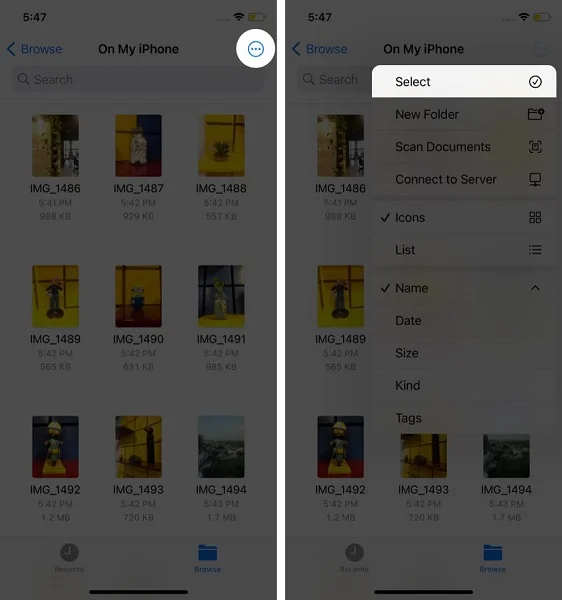
Step 4: Select multiple images. Hit the "More" button, which you can now find in the bottom left corner. Then tap on "Create PDF".
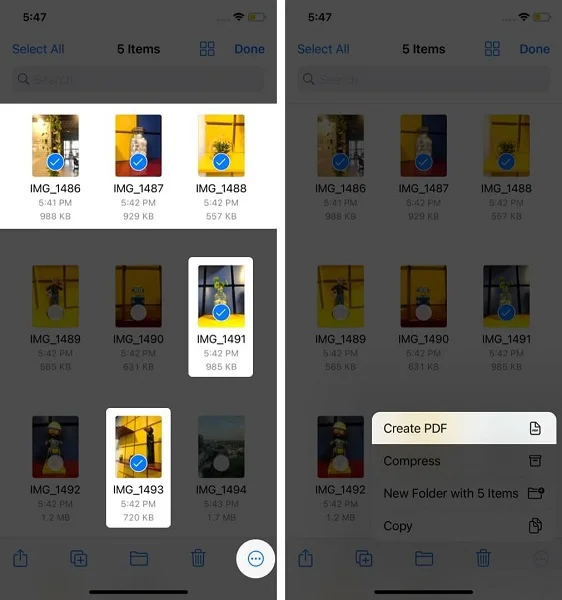
Whether you're converting one or more photos, the PDF(s) will be saved in the same folder where the photos are located.
Another quick way to convert photos to PDF on iPhone without third-party apps is by using the Books app. While this method is fast and convenient, it doesn’t offer customization options. Follow these steps to get started:
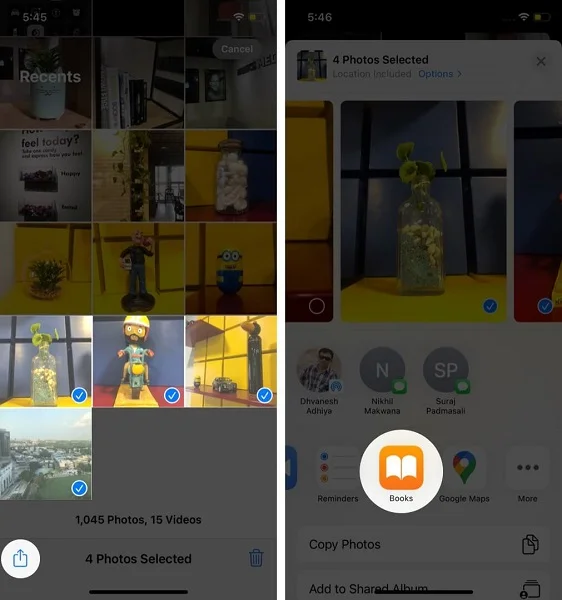
Step 1: Open the Photos app and select the photos for conversion to PDF. If you select multiple photos, they will be merged into one file, just like in the second method we discussed.
Step 2: Tap the "Share" button from the bottom left and choose the Books app in the list. The selected photos will be converted into a PDF file and saved in Books.
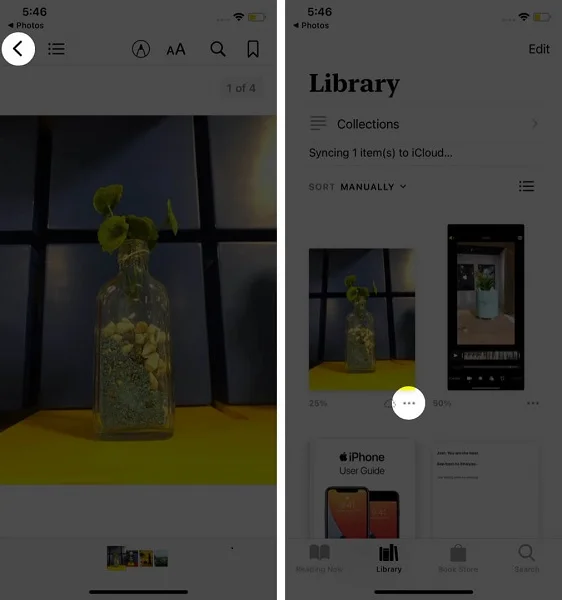
Step 3: Now head to the Books app and Library part to locate and open the photo in PDF format.
If you often work with photos on your iPhone or need more advanced features, FoneGeek iOS Backup & Restore could be a great option. It can can export all photo, video, and audio files from iPhone/iPad to a computer with one click. While you are exporting your photos, for instance, you can transfer and export images in PDF format from your iPhone.
Now, let’s dive into a step-by-step tutorial on how to convert your iPhone photos to PDF.


Step 1: Connect your iPhone device to the computer using a USB cable. Then download and install the FoneGeek iOS Backup & Restore.
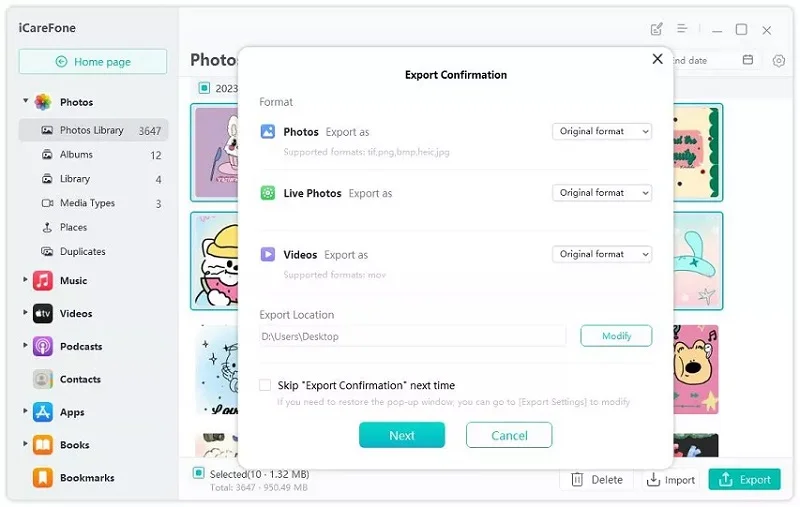
Step 2: Now open the software and choose "Manage". Then click on the "Photos" section and pick out the photos you want to be exported to your computer in PDF format.
Step 3: Once you're done selecting, click the "Export" button and choose the PDF format in the pop-up window.
Step 4: Finally, click the "Next" button; the selected photos will be exported and saved as PDF files on your computer.
Yes, you can! There are multiple ways to convert photos to PDFs on your iPhone, including using the Apple Photos app, the Files app, or other apps. These methods allow you to handle document tasks directly on your device without needing a computer.
You can convert various image formats to PDF, including JPEG, PNG, HEIC, and other common file types found in your iPhone's photo gallery. Most PDF conversion tools on iPhone can handle these formats without any problems.
No, converting your photo to a PDF using built-in iOS apps typically won’t affect its quality. However, if you use third-party tools, some may compress the image, which could impact its sharpness, color accuracy, or overall quality.
Yes, you can save pictures stored in iCloud as PDFs on your iPhone. Simply access your iCloud photos through the Photos app or the Files app, and follow the same steps as you would for photos stored locally on your device.
No, you can't directly convert an image to a PDF using Siri on your iPhone. While Siri can assist with tasks like opening apps or sending files, converting an image to a PDF requires either using built-in apps like Photos, Files, or Books, or a third-party app. You can, however, ask Siri to open the specific app you need, and then manually follow the steps to convert the image to a PDF.
We hope the steps we shared help you easily turn your iPhone photos into portable PDFs and boost your productivity. If you prefer using third-party software, FoneGeek iOS Backup & Restore is an excellent tool for various tasks, including converting photos to PDF. But if you prefer sticking to iPhone's native apps, you can choose from the Printer Options, Files, or Books apps to do the job.
As a professional writer who is interested in technology, Edwin J. Parke has helped thousands of users by offering various tips to solve their problems.
Your email address will not be published. Required fields are marked *


Copyright © 2025 FoneGeek Software Co., Ltd. All Rights Reserved


 English